 Pro Roundup for Volunteer Coordinators: How to Use Facebook Groups for Nonprofits
If you want to create an online space where your organization’s volunteers, supporters, staff, and/or the general community can visit to engage with your work, it’s time to consider starting a Facebook group for your nonprofit.
A Facebook group is separate from your organization’s Facebook page; however, it can be an even more powerful tool to market your organization’s impact in the community and how your volunteers contribute to that impact.
Read on for our curated list of resources that will provide you with easy to follow advice in creating Facebook groups for nonprofits that will keep your volunteers engaged in your organization’s work, and if you determine the need, will bring new volunteers to support to your cause.
A Step-by-Step Action Plan to Creating a Facebook Group for Your Nonprofit
Create a Project Plan– Teamweek
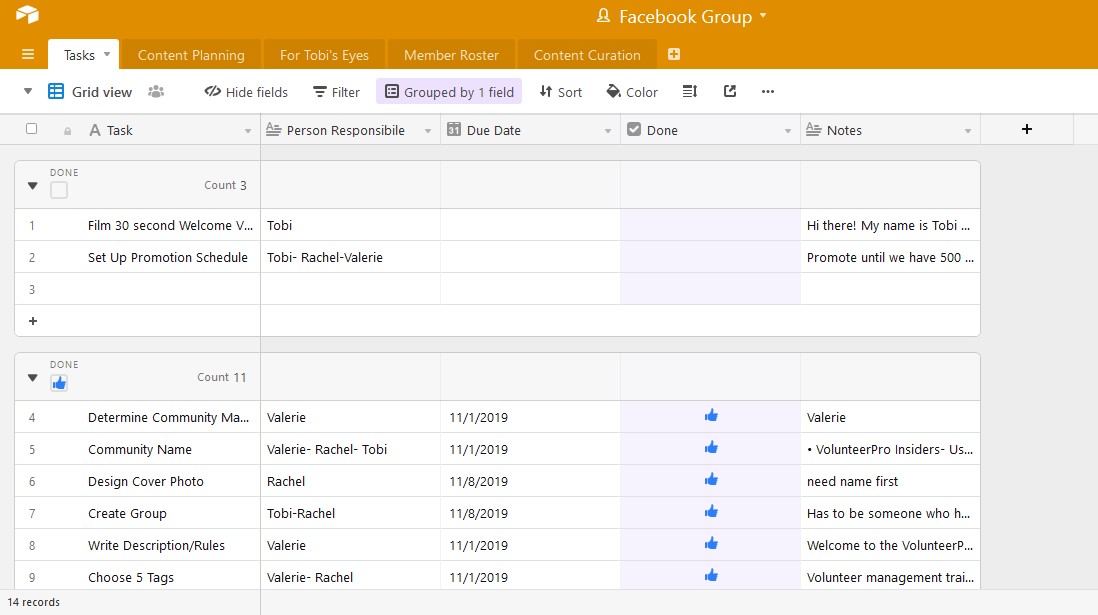
Using an online project management software (we use Airtable, see below) or an excel spreadsheet, you can easily keep track of the many one-time and recurring tasks that go into creating and managing Facebook groups.
A well-designed project plan will answer the following questions:
- What tasks need to be completed?
- Who is responsible for completing each task?
- What is the deadline for completing each task?
Here is an inside look at what our project plan looks like:

Our project plan includes extra tabs for content planning, for high-level information requests that require Tobi’s input, a tab for keeping track of members (it’s to be determined how we will use this tab- most likely it will be to track members who were banned from the group due to breaking the rules), and ideas for future content.
Your plan can be as detailed, or as simple as you like!
Create Your Group- Neil Patel
Now that you have a project plan in place, it is time to start building a Facebook group for your nonprofit! You should start by asking yourself why you are creating this group and get some feedback from your colleagues and your volunteers.
To get the conversation started, there are a couple of reasons why your organization might want to jump on the Facebook groups bandwagon:
- You want to engage the volunteers you currently work with to create a sense of community among them, which will encourage them to stay on as a volunteer with your organization and increase your retention rates.
- You want to create a Facebook group for the public to learn more about volunteering at your organization. This can be a tool to engage current volunteers AND recruit new volunteers.
Once you determine who your audience will be, you can start figuring out the essential aspects of your Facebook group:
- Who will be the community manager? The community manager should be someone who works directly in managing some aspect of the volunteer program and someone who has time to dedicate to being in the group for at least 15-20 minutes per workday.
- What is the group’s name? Come up with a shortlist of 4-5 names you are happy with and open it up to your current volunteers and/or social media followers to vote on the final name. You will create a sense of engagement from the beginning AND start creating buzz around the opening of your Facebook group for volunteers!
- Write the group description and rules. In a perfect world, everyone would be kind, respectful and helpful always. However, this is sadly not the case, and while most people have good intentions when engaging in online discussions, it is easy for the true meaning of someone’s word choices to get lost in translation. This is where your Facebook group description will come into play. Your description should tell people what the group is about. This is also a place you can post your group rules, so people will know exactly what to expect upfront.
- Learn how to keep trolls out! In the online world, you will learn quickly that Facebook bots and trolls are real and can potentially lead to damage to your organization’s reputation in the community. To deter potential bots from getting access to your Facebook group, ensure you have it set up for the community manager to approve every single person who requests access to join. You can also request that each person answers up to three questions, which can help your community manager determine the validity of accounts.
- Create some basic content. Before you open the group up to members, it’s a good idea to populate the group with a bit of content to engage them right off the bat. Three posts you can create right away include a 30-second welcome video (pinned to the top for every member to see as the first post when they join the group), a welcome post, and a cover photo.
When you have all these elements in place, you’re ready to create your group on Facebook!
Promotions and Content Schedule
Growing Your Facebook Group- Screw the Nine to Five

If the plan for your Facebook Group is to engage current volunteers AND recruit new volunteers who aren’t already connected to your organization, then you need to learn how to promote your Facebook group. And of course, because this is the nonprofit world, you need a plan that won’t cost you a dime!
Here are a few quick tips to get you started:
- Announce the group via agency newsletters/blog posts.
- Add a link to the group on your volunteer recruitment landing page.
- Create a graphic with a link to request access and add it to your email signature. Your marketing and/or IT colleagues can help you with this!
If you are one of the lucky ones that have money in your budget, you can also use paid advertising on Facebook to broaden your reach.
As a rule of thumb, you should promote your group using these methods until you reach at least 500 members. At that mark, you will be well on your way to creating daily engagement in your group with minimal effort on your part.
If you are creating your group simply as an online meeting place for your current volunteers, this number won’t matter so much for you.
Develop an Easy to Follow Content Calendar- HubSpot
Organizing your content weeks, or even months, in advance will save you time, stress, and worry over what you are going to post to keep engagement up in your Facebook group. You can use an Excel spreadsheet or project management software to document your groups’ social media activities.
What should you include in your content calendar? How detailed you get is up to you; however, it’s recommended that you include the following:
- The message you want to include with the content.
- The date and time you are publishing the content.
- A link to the content (if linking to something outside of the group).
- An attachment of any images and/or media you are using in the post.
- A checkbox for you to check off when the content has been posted.
Having all this information in one place will also make it easier to keep engagement up during times when your community manager isn’t able to attend the group.
Keep in mind that even if you plan well in advance you still need to moderate your group, facilitate discussion, and reply to member questions regularly.
Content Development Tips – Post Planner
The goal of a Facebook group is to create engagement and discussion that will keep bringing volunteers, and potential volunteers, to your organization, both online and in real life! But without leaning on your marketing team too much, how do you know if you are creating the right content.
To make it easier on yourself, start by creating a theme for each day of the week you will be posting. For example, you might create a schedule like this:
- Motivation Monday (share inspirational photos and quotes).
- Topic Tuesday (share something that is happening in your field).
- Welcome Wednesday (if you are welcoming new members every week, this is the perfect time to welcome them and encourage them to introduce themselves).
- Thankful Thursday (spotlight a specific volunteer/project and share the impact they had on the organization).
- Friday Feedback (share something you are working on and ask for input).
Once you have a framework of themes (rotate themes every week, if you want more variety), you can get more specific with the content of the post.
When to Post New Content- Sprout Social
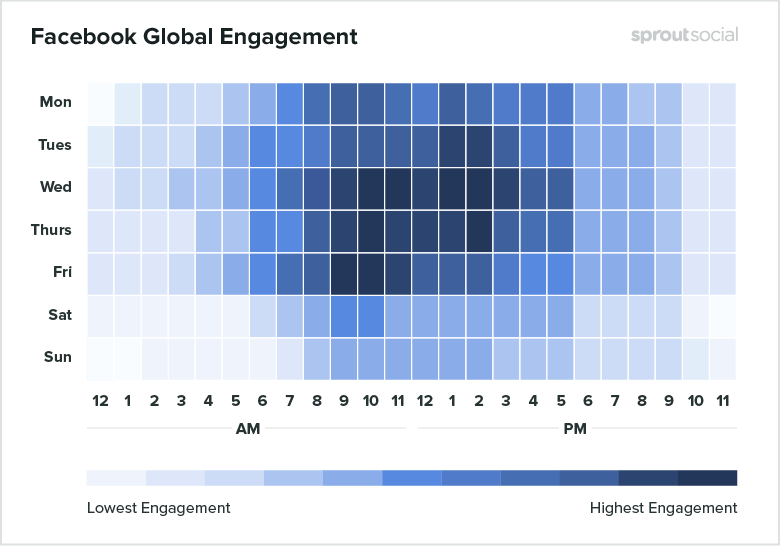
 Just as there is a best time to call and email, there is a best time to post in your Facebook group, that will ensure the most eyes see the content. When you complete your content strategy and place it into a calendar, it’s time to start considering the days of week and times of day that your content is most likely to engage your group members.
Typically, weekdays between 9 am – 3 pm will garner the most engagement; while Sunday is a day you won’t find many people interacting with your content.
This isn’t to say you shouldn’t experiment with trying different days and times, every group is different and if you are providing high-quality content, your followers will consume it regardless of when you are posting it.
Final Tips for Creating Facebook Groups for Nonprofits
Tips for Going Live- Social Media Examiner

Hopping in front of a camera can be a challenge for the most seasoned pros. Add the element of being live, and you may feel stress and anxiety over the fact that there is a perceived risk for little to no room for error.
However, live broadcasts are one of the greatest tools you have in engaging your Facebook audience if you do them the right way!
Before you let the fear of going live sweep over you, ask yourself if it truly makes sense for your group. You can’t just turn the camera on, ramble for a few minutes and expect your followers to show up and stay engaged. Ask yourself: what are the goals of your live videos, and how will you track our progress.
For example, perhaps you have a goal of recruiting 100 new volunteers for a volunteer project at your organization. You can create a series of live broadcasts that trend towards reaching that goal. Your schedule may look something like this:
- Week 1: Introduce the project and the problem it is solving.
- Week 2: Introduce team leaders, their roles, and the volunteer roles you are looking to fill.
- Week 3: Re-purpose content and show how clients have been impacted by this project.
- Week 4: Ask followers to post questions (about the project, about the organization, about benefits of volunteering at your org) in the event discussion page and host a Q&A session to answer them all.
- Week 5: Introduce your call to action. Ask followers to sign up to volunteer for the project and ask them to share the opportunity with their friends, family, colleagues, etc.
Whatever their purpose is, do not be afraid of hosting live broadcasts in your Facebook group! They give you an opportunity to engage with your members on a more personal level.
The Time for Facebook Groups is Now!
It is a common misconception that Facebook engagement is down, when in fact, recent studies show that people are spending even more time on Facebook.
The nonprofit sector can take advantage of this trend by creating Facebook groups for nonprofits that will engage volunteers, encourage retention, help recruitment efforts, and position their organizations at the forefront of local communities as THE place to volunteer time!
If you are all in on creating a Facebook group, follow the advice above and watch as you grow your volunteer program to new heights!


